Xericor's Tactica:
Infantry Assault (Small Base)
Step One – The
Approach (Minimap)
Instead of steaming
full speed ahead into any fight, take a moment to understand your
location and plan your attack. It is always best to think-out your
moves ahead of time. To help you do this you must learn to extend
(and collapse) your minimap.
The default key for
this is 'H'.
When moving to and from
locations always use the map in its extended format. This allows you
to spot any enemy units ahead of time.
When fighting in close
proximity, knowing what is 100yards away from you becomes less
important, so a collapsed (small size) mini map is better as it
becomes less of a distraction.
The other aspect to be
aware of is what you are actually attacking, what type of base is it,
who holds the territory and who holds the surrounding area.
In this example we are
going to use a small base with two main approaches – one, blue,
which we hold, and the other, red, which the enemy holds, and we are
going to place the base directly in the middle.
Every base has a
capture point (with larger bases having more than one point), and a
'safe area/spawn room' where the enemy can respawn, rearm, and fire
from relative safety. It is key that we identify these areas before
we arrive at the base, then understand how they sit in proximity to
the layout of the base.
In this example we can
see that the capture point is at the base of the tower, in a
courtyard which is closed on three sides, and that the enemy spawn
room is at the far end of the base up a slight ridge.
Attacking into and
through buildings always favours the defender – they can set traps
and have a small target area (the doorway) to cover. People coming
through a doorway present easy targets to a defender hiding in a
room.
We can therefore draw a
theoretical line along which we can expect to meet an enemy defence,
shown on the map as the long red line.
Tip – Attacking
through a Doorway
Always be on guard when
moving into a building where you know, or suspect, there are enemy
agents. The first thing to check for is explosives placed near the
entrance to the room. AI mines and C4 are common weapons employed
here.
The map also shows one
other key point – a section of 'no man's land'. This area is marked
by the letter 'A'. This area is a direct approach from the respawn to
the capture point but it is completely free of cover. Any player
trying to move up or down this patch of land will be shot dead before
they could make it half way. No combat will take place along this
path.
Step Three –
Controlling the Area
In order to fully lock
down the base we must look at what we can and cannot control,
identify where the enemy will be, and what positions we need to hold
in order to restrict their movement and stop any counter-assault on
the capture point.
The place to start is
the place we cannot control – the enemy spawn area.
To do this we must look
at what the enemy can and cannot see from the safety of their area.
In this example I am going to cheat a little and take a couple of
shots from the enemy spawn area.
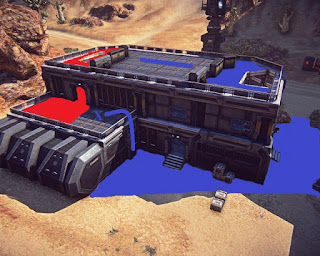
These two photos show
the view from the enemies perspective.
The following picture
shows the safe approach to taking this building.
Note the front balcony
is marked with an 'X'. While a Light Assault can easily scale this
height, the entire balcony is in clear view of the enemy. Anybody
trying to take this approach will be in clear view of enemy fire.
This path is not recommended. Instead, to take this building, we must
take the roof.
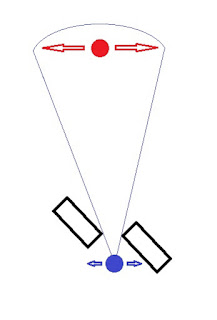
As we can see the area
we can cover extends in relation to the distance to the target. What
this means is that when giving fire, our target has to move further
to avoid receiving damage, while we need only do a small side step to
completely avoid the enemies shots.
This makes the top
barricades vital positions to hold, in unison with allied troops
covering the ground floor entrance/exits.
Advanced Tip – Light
Assault troops should also consider raised structures when selecting
advantageous firing positions. Often these areas have nice concealed
shooting positions where the enemy will never expect to find you!
Step Four – Lock-down
Positions
Often assaulting a base
comes down to remembering 2 key principles -
Restricting the enemy
movement
Intercepting or
blocking reinforcements
In our example we can
mark these paths with the letters, A to E.
B, C, D – These are
the key positions to lock down the enemy base. Positions B and C can
be held by any class of troops. Position C is best taken to Light
Assault troops who can jetpack directly to the roof and avoid the
dangers of attacking through buildings.
E – Represents one of
the Advanced Firing Positions, the type of which the enemy will not
immediately place you. In this example we have the rocky side of a
mountain, a position good for snipers, or rocket armed troops.
Tip - NV Scope
Most scopes are usually xRange to help with aiming and shooting at distance. For situations like this, where the fighting is all close range, consider ditching you regular scope and using a NV scope instead.
In Summary -
Hopefully this guide
has gone some way to helping you better understand positioning when
taking and assaulting a base. Never stand around like a lost sheep in
one area, always consider the possible route of the enemy and get
yourself in the best position you can.
Think ahead and take a
look at the area you are attacking prior to arriving there. Identify
key areas you need to take, and think where the enemy will be, where
they will try and move from and get yourself into the best position
to stop them from doing so.
If you control the
situation you will control the battle.


No comments:
Post a Comment