Well.. after dabbling over the years in making various games I thought I would try my hand at actually getting something done for others to sample. What better place to start than over at Boardgamegeek.com!
While I work at the game I hope to continue this blog on its design, giving a view of the game, the rules when they are ready, and also an insight into the mechanics and decisions I make while making the game.
Anyone interested can find my thread over at BGG, here -
http://boardgamegeek.com/article/9624813#9624813
And the premise of the game?
2013 Post Apoc Survival!
Enjoy!
2013: An Apocalyptic Survival Game
On December 21, 2012 the world ended. Trouble is, it didn’t end for all us...
2013 is a team manager style survival game, set in post apocalyptic version of the real world. The player takes the role of a group of survivors, a rag tag bunch of people, young and old and leads them in the search for food, water, and other useful items.
What makes 2013 unique is its attention to detail. All maps are to scale and based on real everyday locations. A street isn’t just a bunch of houses in a row, its a scavenge hunt through actual rooms. Looking for food means hitting the kitchen and dining areas, new clothes and bed sheets means taking the stairs to the next floor and searching the wardrobes.
Easy enough. But that’s only half the story... aside from run ins with other scavengers in this dog eat dog new world, there lurks something 'else'... people have changed... they call them the 'Diseased'.. and they are hungry for flesh...
This isn’t some gun toting Zombie shooting apocalypse. This is real. This is Sarah Wilkings, 27, Office Assistant, Survivor. This is Stanley Jefferies, 64, retired Geography Teacher, Survivor. This is Claire Smith, this is Scott Bond, this is you. This is the end of the world.
How long will you survive?
How long can you survive?
Tuesday, 17 July 2012


Fortress America Strategy Guide, Part 5: Invader Cards, Western Player
The 2012 edition introduces a new set of mini-decks (8 cards) for each of the Invader players. These cards are optional and the game can be played as normal without them, but should an Invader wish to use them, they do so in their Reinforcements phase, drawing 1 card and 5 units as Reinforcements, instead of 8.
This is a big sacrifice for the Invader, cutting down almost half the units they receive for a random drawn card and effect. Considering the need for the Invaders advance each turn, are these cards really worth it and if so when is the best time to draw them?
In this article, and the following two, I will look at the practical aspects of the cards – what they need to play them, and if the cards are worth the delay to the Invader.
I have decided to split this part of my guide into 3 articles, each addressing a specific Invading player, so as to avoid a great wall of text.
The following map shows the key strategic locations the Western Player must hold in order to be able to play all his cards.

The Red Areas are 'must haves'.
The Orange are back up areas, places that should be taken to help relieve the pressure on the red areas.
An example would be the 'Mineral Resource' areas. The Western player has a card that requires him to hold TWO Mineral Resources'. If he draws the card and doesn’t hold two areas, then he has effectively stalled part of his turn, that is the card is of no use at the present time, and he is behind by 3 reinforcement units.
The red areas show the easiest (or the most convenient) areas to hold. The orange areas are locations that will possibly overlap with the Southern Player, or else to far away, in dangerous US held territory or are otherwise tough to guarantee will be held by the player.
Staying with the Mineral Areas as the example, in particular the northern most area in the Rocky Mountains. We can see with a standard attack pattern (one relying on Helicopters to aid the advance) the MINIMUM amount of turns the Western Player needs to take this area is '3'.
Using examples like this we will also have some idea as to the best time to start drawing Invader cards.
If the Western Player uses the map as an example of what areas (Red areas) he needs to hold, we can see that he is guaranteed of being able to play all his cards at the END OF TURN 3.
That is the minimum, assuming America doesn’t win any of the battles against the Western Player.
The average playability of the Western Invader deck is 2 TURNS. That is on a standard advance, based on the map, the Western player is will be able to play half his deck after turn 2.
Now we have an idea of when to start drawing cards, let us look at the actual card effects and see if they are worth the risk of drawing.
Card Name: Will to Conquer
Remains in play. Allows the Western Invader to once per combat in which he is the attacker, take one of his casualties and still resolve its attack.
This is an excellent card, and helps a great deal in ensuring the attacker still resolves a 'Combined Arms' attack (page 17 states a player still has combined arms if his firing units contain one of each air/mech/inf. Even though this unit is a casualty it is still a 'firing' unit).
Minimum Playable Turn: End of turn 3
Card Name: New Shanghai
Effect is to class Seattle as an Invasion Zone.
Although the Invader needs to advance, and every step forward is a benefit, having Seattle so close to the Invasion Zone already, doesnt buy the Invader much of an advantage. Adding to this the card is lost if America retakes Seattle makes this a weak card.
Minimum Playable Turn: 2. Requires Seattle. Seattle is already a Western target, so play is almost guaranteed in a standard game.
Card Name: Reinforcements
Allows the Western Player to take 3 units from his graveyards and add them back to his reserves.
The Western Player has 2 of these cards in his deck, and both can be held in hand and resolved in any Reinforcement phase. This makes them very valuable. Who doesn’t want 3 Bombers back for mid to late game? Excellent card.
Minimum Playable Turn: Effectively end of turn 1, but if you need 3 Bombers back this early, go play a different game!
Card Name: Mountain Passes
Grants the Western Player the ability to not need CA for combats in the Rocky Mountains area.
This is another poor card for the Western Player. Although it is nice, most good armies already have a combined arms force, or the ability (with good use of Bombers) to receive CA. The Rocky Mountains are always a nightmare to cross, this card helps small engagements where maybe a couple of hover tanks need to displace an annoying Partisan unit, but aside from that, and combat elsewhere, it is of no use.
Minimum Playable Turn: 3. Requires Salt Lake City. Although SLC is a target for the Western Player, its a mid game target, and given a large force is needed to take it, this large force is usually powerful enough to push through the Rockies without needing this card.
Card Name: Refractive Armour
Remains in play and adds a 10% defensive bonus to your Helicopters and Bombers from the US players Lasers.
Undoubtedly powerful, the US players Lasers have a habit of frying Invaders much needed Bombers. Anything that increases the difficulty (even by as little as 10%) has to be a bonus. This is a nice card to draw early game, as it isn’t much use at all if your Helicopters and Bombers are already destroyed.
Also the fact it gives no Military bonus (the defence is great, but its at the discretion of the America player to fire at you. If he doesn’t, this card is worthless), makes it a little suspect as to its value
Minimum Turn Playable: End of 1. Requires San Francisco. Very easy playable requirements.
Card Name: Airlift
Scouting Helicopters can transport 1 Infantry Unit for 1 turn.
This is another card that although easy to draw and play, has very restrictive effects. It requires Helicopters to be in position with Infantry, often not viable as Helicopters love to Scout ahead. However, there is a very understated bonus to this card – Infantry can attack and move as normal after they disembark from the Helicopter.
Add to this you can play the card during any of your Manoeuvre Actions, gives you the chance to get Helicopters and Infantry in position and take America by surprise. A very nice tactical card.
Minimum Turn Playable: End of turn 1. Requires LA. An easy target for the Western Player.
Card Name: Long Range Bomber Prototype
Allows one bomber to move up to 8 spaces in both Manoeuvre and Invasion phases.
A tricky card here as it doesn’t state if it remains in play or if its just for one turn. As other cards specifically state 'Remain in Play' we took the house decision that it doesn’t remain in play.
This makes the card another situational specific card. One has to question when a Bomber would be needed to double its move, given that it already is the fastest piece in the game. And that Invaders cant coordinate attacks, so flying across the board to help another player isn’t all that viable either. The best use of this card would be to destroy annoying Partisan units that pop up behind your lines and threaten a city, when your main forces are to far away to respond.
A precision strike with one bomber is not viable given that any defender strikes first. Losing a Bomber to an Infantry unit would be at best embarrassing at worst a very poor trade.
Minimum Turn Playable: End of turn 1. Requires LA.
In summary,
The Western Deck is best left to the mid-game before the player begins to draw cards. His advance should be well under way, with Salt Lake City close to falling, and LA/San Fran both secure and under his control.
Air is favoured in this deck, with Bombers and Helicopters receiving benefits (or being part of the requirements). The deck also has 2 cards specifically designed to return units from the graveyard. These should be spent restoring lost Air, which are the games most powerful units, and increase the playability of the rest of this deck.
Coming Next: the Southern Invaders Deck
Wednesday, 4 July 2012
Fortress America Strategy Guide, Part 4: American Partisan Cards
Firstly a 'thank you' to all the people who have been following these articles. Its good to know there are other fans of this great game out there!
In this article I will be looking at the Partisan Deck of Cards, used by the American Player to gain reinforcements.

The Partisan Cards are hugely important to an American Victory. Survival relies on a good strategy and maximising the resources available to a player, effective use of Partisan Cards is make or break for America. Without these cards no amount of good play can overcome the fact America is outnumbered 60 to 180!
As Partisan cards are drawn at random, its hard to base a strategy around them, but we can still learn a lot from a look at the numbers involved.
Of the 31 Reinforcement cards,
24 give actual Military Units and 7 do not.
For now we will look at the ones that give units.
The starting chance of drawing specific units looks like this,
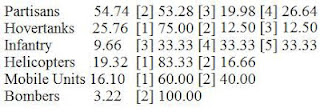
The first number is the overall percentage chance that a card drawn will give the unit type. The numerical reward, in terms of actual models, is shown as [x], then the chance of receiving that amount.
It looks more complicated than it is. One simple way to read the chart is by using 'Bombers' as an example.
When you draw a card (and its one of the 24 of 31 that give you Military Units), then there is a 3.22% chance that the unit you will receive is 'Bombers'.
If you do receive Bombers then its 100% chance you will receive 2 Bombers as a reward
In short, its a long way of saying 1 card in 31 will give you 2 Bombers!
For Partisans it goes like this,
54.74% chance that card gives you Partisans
53.28% that you will receive [2] Partisan models, 19.98% its worth [3] models, 26.64% its [4] models.
Now, that's a lot of numbers, and only really viable pre-game, as each time a card is drawn it is played and discarded, which changes the overall percentage chances drawing your next card.
What we can learn from these numbers
Conventional Forces (Infantry, Tanks, Helicopters etc. Anything none 'Partisan') can be drawn as Reinforcements
This is important to America because the US player starts with ALL his conventional forces on the board. This tells us that in order to maximise our draws we must lose a number of our starting forces. Remember the key to victory is getting the best from units and Partisan cards.
Let us look at the ideal number of casualties America should take to play the numbers game.
Hovertanks – the maximum you can receive from a draw is 3 models, but you are more likely to receive only 1. Approximately 1 in 4 cards will produce Hovertanks, so its important we have some of these models (max 3) in our casualties.
Infantry – maximum reward is 5, minimum 3, with an equal chance of receiving 3,4 or 5. Infantry have a low draw chance, but as Foot represent the largest of our conventional force (and in turn the largest of our casualties) we don’t need to worry about having models in our casualty pile as its likely we will have lots!
Helicopters – Draw chance is approximately 1 in 5 cards, and the reward is worth 1 (most common) or 2 (uncommon) models. Helicopters are valuable units be we can afford to lose one to benefit from Partisan draws.
Mobile Units – Have a low draw chance, and a tight reinforcement number, with 1 or 2 models as the expected reward. Mobile Units are far more important to the Invading player, so its likely we will have these in our casualty pile as its common practice to allow them to die.
Bombers – ah, the powerful Minneapolis card! This is worth discussing on its own as it is a hard card to play, so we will address this as the first of our 'close-up' looks on cards.
Before I do, here is a quick note on ensuring casualties.
Most players when they start out as America take a look at the board and soon identify that half their army is going to die on the first turn. Their gut reaction is 'well, I'll place my weak units there then', which in a standard game is fine.
All we need to do is place a couple of tanks/helicopters in cities that will fall. As the defender fires first, and its likely the attack will bring Combined Arms, means at best we are simply exchanging like for like (tank kills tank, helicopter kills helicopter). The beauty is we know we stand a good chance of getting these casualties back as the game progresses.
Now a look at a single card in-depth.
Partisan Card: 'Commercial aircraft converted in Minneapolis'

Effect: Place two helicopters and two bombers in Minneapolis. Then discard this card.
As we know, Bombers are the most powerful unit in the game, then Helicopters. This card is the only one to reward the American player with replacement Bombers. It is on first look a very powerful card, and while the unit rewards are undoubtedly powerful, the card itself is not.
Why not?
Well first consider the Bomber as a Unit. It is the most powerful, but also the safest unit to use. It gets to choose its combat, and is always the last to be removed as a casualty. The American player has lasers to target Invader Bombers, but the only way for America to lose its own Bombers is through bad play, a mistake, or a suicide run by an Invader.
The defender strikes first. Air Units choose their targets. The only real way to destroy Air Units is with Air Units. An Invader can sacrifice his own Air Units to attack the American Air Force, but he risks being destroyed before he can do any damage. In summary Bombers are very unlikely casualties.
Then we must consider the chance to draw the card. It is one card in a deck of 31 cards. With American victory on Turn 10, and standard 2 draws per turn from the Partisan Deck, there is a good chance this card wont even be drawn. Which is usually to the benefit of the American player, as the majority of the times this card is only worth a Helicopter or two.
It is best to think of this card as a 'Secret Weapon'. Its powerful, and there will be a time that it will win the game. Such a time will be a good talk for years to come, but otherwise don’t expect much from this card.
Before we look at few other cards in detail I want to introduce the following map. Its a kind of 'heat chart' for Partisan Card activity.

The colours are as follows -
Red – key areas that America really needs to hold to ensure the benefit of a good card.
Purple – powerful areas, which are the focus of a lot of cards
Dark Blue – strong areas of Partisan activity
Blue – common areas, effected by a good amount of cards
Cyan (Light Blue) – areas with OK coverage
Green – areas supported but not in great number
Light Green – lightly effected areas
Yellow – very few Partisan cards target these areas
The first points that are easily identified in this chart are,
Colorado Springs
The battle for Colorado Springs is always a real tough fight. Not only does this city lie in the 'Key 9' belt for a standard game, but it is also the target of a powerful Partisan Card – a free laser!
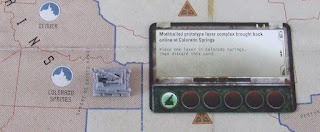
The chance of drawing the card is very low, but Colorado Springs should be a City the American player fights for already, so it only adds to the importance of winning here.
The Boston Mountains (Purple)
A large number of cards can effect this location making it an important territory to hold, especially considering its lies in the middle of a cluster of 4 cities, and as an anchor between Colorado Springs and the centre push for the Southern Player.
Yellow and Light Green Plains (Centre North)
Expect little or no reinforcements to these locations. The only good news is the few cards that do effect this part of the map are usually quite powerful (providing a good chunk of units), however we cannot rely on drawing these cards, so if the Invader makes it to here, its game over for America.
The left hand side of the map is Blue!
This is largely due to the Rocky Mountains, as they form an excellent line of defence. Almost every step of the way here can be influenced by Partisan Cards. The centre left is also dark blue. This can be used as part of a strategy to cut off the Western Players supply lines and further hamper his advance. A strategy we will look at in a future article.
Cities are not marked
Aside from the ones marked Red, which America would do well to hold, there are very few cards that actually directly effect Cities, or units in Cities. As these locations are the source of victory or defeat we must address the real use of Partisan Cards.
Partisan Cards themselves cannot win or lose the game.
Effective use of Partisan Cards will win the game.
If you have managed to survive reading this far we now know roughly the amount of conventional troops we need to take as casualties in order to maximize our reserves, and we have a good idea of where Partisan cards will take effect. Now we will look at the actual in-game use of troops that we receive from these cards.
I will use a number of cards from the deck to illustrate actual tactical manoeuvres, but the principles apply across the range of cards, in particular the principle of defence, how territories are taken and how the armies advance.
Defence: Stalling Tactics
A player can only take a territory in which he has placed a Control Marker, indicating his intention to attack. And he can only move to take the territory in the Invasion Phase (final movement phase). This typically leaves an army only moving one territory per turn, with any Manoeuvre Movement it has being wasted.
One good tactic when using Partisans is to place them, then simply move them into an adjacent, empty enemy territory. This creates a buffer zone into which the enemy can freely move and retake, but cannot progress past with Manoeuvre Movement.
Not only is this a good tactic to delay the enemy, but it is also a viable tactic to use to cut the Invaders Supply Line. Four Partisans placed in the same region, which then move to adjacent territories can effectively take 8 locations and cause the Invader a real nightmare.
Any action that delays, hampers, or forces the Invader to turn his forces around buys the American player valuable time, and time is all he needs to win the game.
Let us look at a few examples of cards in play, and how to employ a couple of tactics.
Card: “Remember the Alamo!” shouted by New Texas Rangers as they raided the invader strongholds in the South.
Effect: Distribute four Partisans among any territories in the Southern Sector. Then discard this card.

This card is typical of the Partisan Deck. It gives a fair amount of models and allows them to be placed over a wide area.
Cards like this can be played in a number of ways.
Example 1: Coordinated Attack

Consider placing them around a City territory (or at a push a strategically valuable territory.) and one that is weakly guarded. The Invader needs to press forward and cant afford to keep a lot of units on defence, so its likely some Cities will be defended by a single Infantry Unit.
Partisans don’t make ideal attackers, especially not in groups, but sometimes the maths (and the potential reward) is worth the risk.
Attacking and retaking the city gives the American player a bonus card, and as you must have at least one unit left to take a city means a chance of inflicting a hit on defence. Not only that but it costs the Invader time. Any army that must head back towards an area that was previously classed as taken is one that isn’t causing further damage in the advance.
Example 2: Fall Back / Delaying Tactic
As previously mentioned forces can only move into and take 1 territory at a time. In this example the Partisans have caused damage (retaken areas) and then can fall back to the better defended mountain areas.

Card: 'Legions of Liberty make coordinated attack'
Effect: Choose two different enemy-occupied city territories and destroy one invader military unit in each of them. Then discard this card.

Cards like this (which allow you to split effects) are great when considering America is fighting on 3 fronts. Tactical flexibility is very important for victory, but when there is one objective then a concentration of force is equally as powerful.
In this example, while the Invader only has 2 Infantry units (weak units and usually not worth spending a card on) the fact that these territories are adjacent means it increases the perception of the threat. While its unlikely the American player can take and hold both cities, the Eastern player is forced to divert a larger force to the area than he would if only 1 City was at threat.
Dictating the enemies movement is a form of control and should be practised as often as possible, even if the actual in-game effect isn’t anything amazing.
Another important game effect to learn (and avoid) is predictability.
Consider this example.
Card: “Wheatfield Thrashers” dig in to protect the nations agriculture.
Effect: Choose four agricultural resource territories and place one partisan in each of them. Then discard this card.

This is a prime example of everything we have learnt so far.
Whilst the card allows for the units to be placed all over the board, concentrating them on one area allows for a multiple of options, all of which keep the enemy guessing.
From here the two Partisans in the bottom of the picture could move to take San Francisco, or move back to the mountains. Likewise the two at the top of the picture could move to threaten Portland, or they could move to the mountains.
There is a chance to retake two cities, or the possibility to take 7 territories off the Invader, surely cutting his supply lines, and digging in on defensible positions.
The key lesson here is don’t be static with your Partisans. Inflict maximum harassment each turn!
Two other cards of note, that are worth a quick mention due to the specific tactical options they offer are,
Card: 'Partisans revolt in the West'
Effect: Place two partisans, one mobile unit, and one helicopter in one territory in the western Sector. Then discard this card
What makes this card so special is that it is an instant 'Combined Arms' Attack Force. It is designed to retake a city, and even brings in a spare Partisan to take a hit!
Its a prime example of managing casualties to ensure you have the units as and when you need them, and of being aggressive.
Card: 'Major Airlift'
Effect: Choose one territory and move any or all US Military units from that territory to any friendly territory or unoccupied enemy territory (even a city territory). Then discard this card.
This is a very powerful card even though it grants no military units or partisans. One use that is obvious, is the relocation of units, either to pull units out of hostile territory thus saving them, reinforcing an area for defence, or simply a quick move to throw off your opponent.
However the key to using this card lies in the words 'unoccupied enemy territory, even a city territory'
Should any Invader leave a city undefended feel free to pop in! If a city is lightly guarded, take a force and capture it.
Another way to use this card is to advance your own defence lines. It is likely, if you are playing correctly, that many front line American cities will have a good sized (max 5) units defending it. Unless its directly threatened (i.e. the enemy is one territory away) that defence force is nothing more than units wasted.
You could lift them closer to the enemy and buy yourself more ground (and thus time to stall the enemy). Even if you don’t plan on holding onto the territory remember the stalling tactic.
Airlift into a territory, take it, then move, taking another territory.
Being aggressive is better than passively sat defending and allowing the Invader to dictate the flow of the game.
Chris
Firstly a 'thank you' to all the people who have been following these articles. Its good to know there are other fans of this great game out there!
In this article I will be looking at the Partisan Deck of Cards, used by the American Player to gain reinforcements.
As Partisan cards are drawn at random, its hard to base a strategy around them, but we can still learn a lot from a look at the numbers involved.
Of the 31 Reinforcement cards,
24 give actual Military Units and 7 do not.
For now we will look at the ones that give units.
The starting chance of drawing specific units looks like this,

The first number is the overall percentage chance that a card drawn will give the unit type. The numerical reward, in terms of actual models, is shown as [x], then the chance of receiving that amount.
It looks more complicated than it is. One simple way to read the chart is by using 'Bombers' as an example.
When you draw a card (and its one of the 24 of 31 that give you Military Units), then there is a 3.22% chance that the unit you will receive is 'Bombers'.
If you do receive Bombers then its 100% chance you will receive 2 Bombers as a reward
In short, its a long way of saying 1 card in 31 will give you 2 Bombers!
For Partisans it goes like this,
54.74% chance that card gives you Partisans
53.28% that you will receive [2] Partisan models, 19.98% its worth [3] models, 26.64% its [4] models.
Now, that's a lot of numbers, and only really viable pre-game, as each time a card is drawn it is played and discarded, which changes the overall percentage chances drawing your next card.
What we can learn from these numbers
Conventional Forces (Infantry, Tanks, Helicopters etc. Anything none 'Partisan') can be drawn as Reinforcements
This is important to America because the US player starts with ALL his conventional forces on the board. This tells us that in order to maximise our draws we must lose a number of our starting forces. Remember the key to victory is getting the best from units and Partisan cards.
Let us look at the ideal number of casualties America should take to play the numbers game.
Hovertanks – the maximum you can receive from a draw is 3 models, but you are more likely to receive only 1. Approximately 1 in 4 cards will produce Hovertanks, so its important we have some of these models (max 3) in our casualties.
Infantry – maximum reward is 5, minimum 3, with an equal chance of receiving 3,4 or 5. Infantry have a low draw chance, but as Foot represent the largest of our conventional force (and in turn the largest of our casualties) we don’t need to worry about having models in our casualty pile as its likely we will have lots!
Helicopters – Draw chance is approximately 1 in 5 cards, and the reward is worth 1 (most common) or 2 (uncommon) models. Helicopters are valuable units be we can afford to lose one to benefit from Partisan draws.
Mobile Units – Have a low draw chance, and a tight reinforcement number, with 1 or 2 models as the expected reward. Mobile Units are far more important to the Invading player, so its likely we will have these in our casualty pile as its common practice to allow them to die.
Bombers – ah, the powerful Minneapolis card! This is worth discussing on its own as it is a hard card to play, so we will address this as the first of our 'close-up' looks on cards.
Before I do, here is a quick note on ensuring casualties.
Most players when they start out as America take a look at the board and soon identify that half their army is going to die on the first turn. Their gut reaction is 'well, I'll place my weak units there then', which in a standard game is fine.
All we need to do is place a couple of tanks/helicopters in cities that will fall. As the defender fires first, and its likely the attack will bring Combined Arms, means at best we are simply exchanging like for like (tank kills tank, helicopter kills helicopter). The beauty is we know we stand a good chance of getting these casualties back as the game progresses.
Now a look at a single card in-depth.
Partisan Card: 'Commercial aircraft converted in Minneapolis'

As we know, Bombers are the most powerful unit in the game, then Helicopters. This card is the only one to reward the American player with replacement Bombers. It is on first look a very powerful card, and while the unit rewards are undoubtedly powerful, the card itself is not.
Why not?
Well first consider the Bomber as a Unit. It is the most powerful, but also the safest unit to use. It gets to choose its combat, and is always the last to be removed as a casualty. The American player has lasers to target Invader Bombers, but the only way for America to lose its own Bombers is through bad play, a mistake, or a suicide run by an Invader.
The defender strikes first. Air Units choose their targets. The only real way to destroy Air Units is with Air Units. An Invader can sacrifice his own Air Units to attack the American Air Force, but he risks being destroyed before he can do any damage. In summary Bombers are very unlikely casualties.
Then we must consider the chance to draw the card. It is one card in a deck of 31 cards. With American victory on Turn 10, and standard 2 draws per turn from the Partisan Deck, there is a good chance this card wont even be drawn. Which is usually to the benefit of the American player, as the majority of the times this card is only worth a Helicopter or two.
It is best to think of this card as a 'Secret Weapon'. Its powerful, and there will be a time that it will win the game. Such a time will be a good talk for years to come, but otherwise don’t expect much from this card.
Before we look at few other cards in detail I want to introduce the following map. Its a kind of 'heat chart' for Partisan Card activity.

Red – key areas that America really needs to hold to ensure the benefit of a good card.
Purple – powerful areas, which are the focus of a lot of cards
Dark Blue – strong areas of Partisan activity
Blue – common areas, effected by a good amount of cards
Cyan (Light Blue) – areas with OK coverage
Green – areas supported but not in great number
Light Green – lightly effected areas
Yellow – very few Partisan cards target these areas
The first points that are easily identified in this chart are,
Colorado Springs
The battle for Colorado Springs is always a real tough fight. Not only does this city lie in the 'Key 9' belt for a standard game, but it is also the target of a powerful Partisan Card – a free laser!

The chance of drawing the card is very low, but Colorado Springs should be a City the American player fights for already, so it only adds to the importance of winning here.
The Boston Mountains (Purple)
A large number of cards can effect this location making it an important territory to hold, especially considering its lies in the middle of a cluster of 4 cities, and as an anchor between Colorado Springs and the centre push for the Southern Player.
Yellow and Light Green Plains (Centre North)
Expect little or no reinforcements to these locations. The only good news is the few cards that do effect this part of the map are usually quite powerful (providing a good chunk of units), however we cannot rely on drawing these cards, so if the Invader makes it to here, its game over for America.
The left hand side of the map is Blue!
This is largely due to the Rocky Mountains, as they form an excellent line of defence. Almost every step of the way here can be influenced by Partisan Cards. The centre left is also dark blue. This can be used as part of a strategy to cut off the Western Players supply lines and further hamper his advance. A strategy we will look at in a future article.
Cities are not marked
Aside from the ones marked Red, which America would do well to hold, there are very few cards that actually directly effect Cities, or units in Cities. As these locations are the source of victory or defeat we must address the real use of Partisan Cards.
Partisan Cards themselves cannot win or lose the game.
Effective use of Partisan Cards will win the game.
If you have managed to survive reading this far we now know roughly the amount of conventional troops we need to take as casualties in order to maximize our reserves, and we have a good idea of where Partisan cards will take effect. Now we will look at the actual in-game use of troops that we receive from these cards.
I will use a number of cards from the deck to illustrate actual tactical manoeuvres, but the principles apply across the range of cards, in particular the principle of defence, how territories are taken and how the armies advance.
Defence: Stalling Tactics
A player can only take a territory in which he has placed a Control Marker, indicating his intention to attack. And he can only move to take the territory in the Invasion Phase (final movement phase). This typically leaves an army only moving one territory per turn, with any Manoeuvre Movement it has being wasted.
One good tactic when using Partisans is to place them, then simply move them into an adjacent, empty enemy territory. This creates a buffer zone into which the enemy can freely move and retake, but cannot progress past with Manoeuvre Movement.
Not only is this a good tactic to delay the enemy, but it is also a viable tactic to use to cut the Invaders Supply Line. Four Partisans placed in the same region, which then move to adjacent territories can effectively take 8 locations and cause the Invader a real nightmare.
Any action that delays, hampers, or forces the Invader to turn his forces around buys the American player valuable time, and time is all he needs to win the game.
Let us look at a few examples of cards in play, and how to employ a couple of tactics.
Card: “Remember the Alamo!” shouted by New Texas Rangers as they raided the invader strongholds in the South.
Effect: Distribute four Partisans among any territories in the Southern Sector. Then discard this card.

Cards like this can be played in a number of ways.
Example 1: Coordinated Attack

Consider placing them around a City territory (or at a push a strategically valuable territory.) and one that is weakly guarded. The Invader needs to press forward and cant afford to keep a lot of units on defence, so its likely some Cities will be defended by a single Infantry Unit.
Partisans don’t make ideal attackers, especially not in groups, but sometimes the maths (and the potential reward) is worth the risk.
Attacking and retaking the city gives the American player a bonus card, and as you must have at least one unit left to take a city means a chance of inflicting a hit on defence. Not only that but it costs the Invader time. Any army that must head back towards an area that was previously classed as taken is one that isn’t causing further damage in the advance.
Example 2: Fall Back / Delaying Tactic
As previously mentioned forces can only move into and take 1 territory at a time. In this example the Partisans have caused damage (retaken areas) and then can fall back to the better defended mountain areas.

Effect: Choose two different enemy-occupied city territories and destroy one invader military unit in each of them. Then discard this card.

Cards like this (which allow you to split effects) are great when considering America is fighting on 3 fronts. Tactical flexibility is very important for victory, but when there is one objective then a concentration of force is equally as powerful.
In this example, while the Invader only has 2 Infantry units (weak units and usually not worth spending a card on) the fact that these territories are adjacent means it increases the perception of the threat. While its unlikely the American player can take and hold both cities, the Eastern player is forced to divert a larger force to the area than he would if only 1 City was at threat.
Dictating the enemies movement is a form of control and should be practised as often as possible, even if the actual in-game effect isn’t anything amazing.
Another important game effect to learn (and avoid) is predictability.
Consider this example.
Card: “Wheatfield Thrashers” dig in to protect the nations agriculture.
Effect: Choose four agricultural resource territories and place one partisan in each of them. Then discard this card.

This is a prime example of everything we have learnt so far.
Whilst the card allows for the units to be placed all over the board, concentrating them on one area allows for a multiple of options, all of which keep the enemy guessing.
From here the two Partisans in the bottom of the picture could move to take San Francisco, or move back to the mountains. Likewise the two at the top of the picture could move to threaten Portland, or they could move to the mountains.
There is a chance to retake two cities, or the possibility to take 7 territories off the Invader, surely cutting his supply lines, and digging in on defensible positions.
The key lesson here is don’t be static with your Partisans. Inflict maximum harassment each turn!
Two other cards of note, that are worth a quick mention due to the specific tactical options they offer are,
Card: 'Partisans revolt in the West'
Effect: Place two partisans, one mobile unit, and one helicopter in one territory in the western Sector. Then discard this card
What makes this card so special is that it is an instant 'Combined Arms' Attack Force. It is designed to retake a city, and even brings in a spare Partisan to take a hit!
Its a prime example of managing casualties to ensure you have the units as and when you need them, and of being aggressive.
Card: 'Major Airlift'
Effect: Choose one territory and move any or all US Military units from that territory to any friendly territory or unoccupied enemy territory (even a city territory). Then discard this card.
This is a very powerful card even though it grants no military units or partisans. One use that is obvious, is the relocation of units, either to pull units out of hostile territory thus saving them, reinforcing an area for defence, or simply a quick move to throw off your opponent.
However the key to using this card lies in the words 'unoccupied enemy territory, even a city territory'
Should any Invader leave a city undefended feel free to pop in! If a city is lightly guarded, take a force and capture it.
Another way to use this card is to advance your own defence lines. It is likely, if you are playing correctly, that many front line American cities will have a good sized (max 5) units defending it. Unless its directly threatened (i.e. the enemy is one territory away) that defence force is nothing more than units wasted.
You could lift them closer to the enemy and buy yourself more ground (and thus time to stall the enemy). Even if you don’t plan on holding onto the territory remember the stalling tactic.
Airlift into a territory, take it, then move, taking another territory.
Being aggressive is better than passively sat defending and allowing the Invader to dictate the flow of the game.
There is a lot more I could say on Partisan Cards, but this article is already very long! I may revisit specific cards and tactics in future articles.
For now I hope you found this informative, and that it doesn’t swing your games too much in the favour of America. I promise the next article will be Invader friendly too even the balance!
Thanks, and good gaming.
Monday, 2 July 2012
Fortress America Strategy Guide: Americas Key Cities
As we know, the victory conditions in FA revolve around taking or losing Cities. In a standard game the Invaders need to capture 18 Cities to win, but with a choice of 30 on the board, which ones do they take, and which should America fight to keep?
In this article I will discuss the 9 Cities which are key to winning or losing the game, based on a standard set-up and strategy.
As we can see from the map below, I have highlighted all the American Cities in the game, and coloured them as follows,

Yellow: These are Cities that the Invaders capture with ease as part of their advance. They are chiefly coastal cities, which the American Player has little chance of holding.
Orange: These are the American 'safe' cities. Due to their proximity to each other they can be easily reinforced. They are also the furthest away from two of the Invaders, as well as being a very hard target for the Eastern player to take. In a normal game, if any of these Cities fall, it is already game over for America.
Green: These are the 'Key 9'. It is these Cities that will spell victory for the players depending if they hold or fall. Of the Key 9, the Invader players must take THREE to establish victory.
So what can we learn from this?
American Player
Place your lasers in the Orange Cities.
These are the only Cities that you can class as relatively safe. That doesn’t mean forget about them, but they are the least likely to be attacked. You are good up to Turn 6 for laser placement if you use Orange Cities, after that future lasers should be brought online in the Cities where you are concentrating your defence.
Move Units OFF Orange Cities
Your starting 12 units (on the six Orange Cities) will not be in danger, so they have no reason to defend. Move them to the front-line asap. They represent a large chunk of your starting Army and need to be used in the fighting, not guarding from nothing.
Evacuate the Yellow Cities where possible, or create pockets of tough defence.
San Fran/LA/San Diego/Phoenix, and, Dallas/Houston/New Orleans. These 2 sections of cities are target Yellow, meaning they are going to fall, but that doesn’t mean you have to make it easy for the Invaders. These two groups are all adjacent to each other meaning you can move units from one, two, or three of them into one strong defence group.
Reinforce the Green Cities
Concentrate your forces in the Green Cities as well as around the Cities. One or two units (ideally Partisans) outside of the City can delay the Invader (as opposed to him using Helicopter Scouting).
Launch opportunity attacks to retake Yellow Cities, use EVERYTHING to retake Green Cities.
Yellow cities are mainly on the coast, and fall quickly behind enemy lines. It is likely you will get reinforcements in the form of Partisans that can threaten enemy held cities, but generally speaking, it is far easier for the Invader to reinforce areas than it is for America. Don’t use conventional force to try and retake Yellow Cities, but if a Green falls, then mobilize everything you have to retake that city.
Invaders
Take the Yellow Cities
This might sound like 'dur yeah', but if you leave them and try to advance past them, you are leaving active enemy forces behind your lines. You do not want this. You will have enough problems dealing with American Partisans without allowing standard military units to still exist.
Lightly defend the Yellow Cities
Partisans forces will threaten you at times, you must leave at least 1 unit defending each city. The American player cant directly place Partisans into cities you have captured, but he can spawn Partisans in adjacent territories and walk straight into undefended cities.
Surround the Green Cities then Coordinate Action
In a standard game, the heaviest fighting will be for these Cities. Insure you have sufficient force to take AND hold the target Cities, but do it together. If one Invader takes a Green City, the American player only needs to concentrate retaking one city. If you coordinate and take 2 Green Cities at once, then the American player must split his force to counter.
Coordinate the Game Winning Move
Never take exactly 18 cities. If you do this and relax, America only needs to retake 1 city to be back in the game. Take 2 or 3 over and watch the American player suffer.
Forget the Orange
Honestly, if you are in a position to take these Cities the game is already won. The Orange cities are the furthest away, which means battling across a board filled with enemy troops and spreading your forces and supply lines so thin. There are always exceptions to this, but generally speaking you already know your targets (the cities you have passed to reach the Orange's!)
Remember the Turn Order
This is especially true for the Western and Southern Players. There are many opportunities for the two players forces to help each other out. The Western player always moves first and attacks first. If an area is especially heavily defended, the Western player can throw his forces at it to soften it up, then the Southern player can strike.
Thanks for reading the third part in my series, in the next chapter I will focus on the American Reinforcement cards and what they mean for all players.
If you have any comments, suggestions, feedback or just want to talk about the game in general, then I am always pleased to listen.
Chris
As we know, the victory conditions in FA revolve around taking or losing Cities. In a standard game the Invaders need to capture 18 Cities to win, but with a choice of 30 on the board, which ones do they take, and which should America fight to keep?
In this article I will discuss the 9 Cities which are key to winning or losing the game, based on a standard set-up and strategy.
As we can see from the map below, I have highlighted all the American Cities in the game, and coloured them as follows,

Yellow: These are Cities that the Invaders capture with ease as part of their advance. They are chiefly coastal cities, which the American Player has little chance of holding.
Orange: These are the American 'safe' cities. Due to their proximity to each other they can be easily reinforced. They are also the furthest away from two of the Invaders, as well as being a very hard target for the Eastern player to take. In a normal game, if any of these Cities fall, it is already game over for America.
Green: These are the 'Key 9'. It is these Cities that will spell victory for the players depending if they hold or fall. Of the Key 9, the Invader players must take THREE to establish victory.
So what can we learn from this?
American Player
Place your lasers in the Orange Cities.
These are the only Cities that you can class as relatively safe. That doesn’t mean forget about them, but they are the least likely to be attacked. You are good up to Turn 6 for laser placement if you use Orange Cities, after that future lasers should be brought online in the Cities where you are concentrating your defence.
Move Units OFF Orange Cities
Your starting 12 units (on the six Orange Cities) will not be in danger, so they have no reason to defend. Move them to the front-line asap. They represent a large chunk of your starting Army and need to be used in the fighting, not guarding from nothing.
Evacuate the Yellow Cities where possible, or create pockets of tough defence.
San Fran/LA/San Diego/Phoenix, and, Dallas/Houston/New Orleans. These 2 sections of cities are target Yellow, meaning they are going to fall, but that doesn’t mean you have to make it easy for the Invaders. These two groups are all adjacent to each other meaning you can move units from one, two, or three of them into one strong defence group.
Reinforce the Green Cities
Concentrate your forces in the Green Cities as well as around the Cities. One or two units (ideally Partisans) outside of the City can delay the Invader (as opposed to him using Helicopter Scouting).
Launch opportunity attacks to retake Yellow Cities, use EVERYTHING to retake Green Cities.
Yellow cities are mainly on the coast, and fall quickly behind enemy lines. It is likely you will get reinforcements in the form of Partisans that can threaten enemy held cities, but generally speaking, it is far easier for the Invader to reinforce areas than it is for America. Don’t use conventional force to try and retake Yellow Cities, but if a Green falls, then mobilize everything you have to retake that city.
Invaders
Take the Yellow Cities
This might sound like 'dur yeah', but if you leave them and try to advance past them, you are leaving active enemy forces behind your lines. You do not want this. You will have enough problems dealing with American Partisans without allowing standard military units to still exist.
Lightly defend the Yellow Cities
Partisans forces will threaten you at times, you must leave at least 1 unit defending each city. The American player cant directly place Partisans into cities you have captured, but he can spawn Partisans in adjacent territories and walk straight into undefended cities.
Surround the Green Cities then Coordinate Action
In a standard game, the heaviest fighting will be for these Cities. Insure you have sufficient force to take AND hold the target Cities, but do it together. If one Invader takes a Green City, the American player only needs to concentrate retaking one city. If you coordinate and take 2 Green Cities at once, then the American player must split his force to counter.
Coordinate the Game Winning Move
Never take exactly 18 cities. If you do this and relax, America only needs to retake 1 city to be back in the game. Take 2 or 3 over and watch the American player suffer.
Forget the Orange
Honestly, if you are in a position to take these Cities the game is already won. The Orange cities are the furthest away, which means battling across a board filled with enemy troops and spreading your forces and supply lines so thin. There are always exceptions to this, but generally speaking you already know your targets (the cities you have passed to reach the Orange's!)
Remember the Turn Order
This is especially true for the Western and Southern Players. There are many opportunities for the two players forces to help each other out. The Western player always moves first and attacks first. If an area is especially heavily defended, the Western player can throw his forces at it to soften it up, then the Southern player can strike.
Thanks for reading the third part in my series, in the next chapter I will focus on the American Reinforcement cards and what they mean for all players.
If you have any comments, suggestions, feedback or just want to talk about the game in general, then I am always pleased to listen.
Chris
Cavalry Tactics: the Detachment
Age of Empires Online, Tactic: Cavalry Detachment (Greek Sarissophoroi)
Since (at time of writing) the main game I have been playing is AoEO, and (at the time of writing) the servers are currently down for maintenance I thought I would share with everyone a simple tactic on how to use Sarissophoroi as a Cavalry Detachment rather than in your main force.
While this tactic is predominately for Greeks, the principle is flexible enough to be used for a lot of other units, and even at a push, with regular (non-specialist) troops.
Before I go into the tactic, its important to understand the concept of a 'Detachment' and in AoEO, why Sari work extremely well in this situation.
In Military Terms, a detachment is a unit separated from the main force to fulfil a specific duty. Often specialist in nature. Sarissophoroi fit easily into this category, being an anti-ranged cavalry unit. They are specialists, and being cavalry are faster moving alone as a detachment than they are rolling along with a conventional infantry based force.
In PvE it doesn’t matter where you build your Stables, just remember to rally your Saris away from your main force.
In PvP the Sari detachment is designed to be a small specialist unit, employed to swing a battle in your favour, and not part of the conventional force. Try to build your Stables to the rear of your base, or at least rally your Sari away from your main force, in a place your opponent is unlikely to scout.
The initial set-up as the two armies approach will look something like this,

It doesn’t matter where you position your Sari's as long as they are not moving with your main force, and not part of the main combat.
Once the two armies meet, order your Sari detachment to move past the combat, at a safe distance as to not attract enemy attention.

Then when the combat is in full swing, have your Sari descend on the exposed enemy Archers!

If you have read my previous article on Infantry Line Withdrawal, then you have the perfect combination and knowledge to totally destroy a enemy force with minimum casualties to yourself.
Thanks for reading.
Happy gaming (once the servers are back up at least!)
Chris
Since (at time of writing) the main game I have been playing is AoEO, and (at the time of writing) the servers are currently down for maintenance I thought I would share with everyone a simple tactic on how to use Sarissophoroi as a Cavalry Detachment rather than in your main force.
While this tactic is predominately for Greeks, the principle is flexible enough to be used for a lot of other units, and even at a push, with regular (non-specialist) troops.
Before I go into the tactic, its important to understand the concept of a 'Detachment' and in AoEO, why Sari work extremely well in this situation.
In Military Terms, a detachment is a unit separated from the main force to fulfil a specific duty. Often specialist in nature. Sarissophoroi fit easily into this category, being an anti-ranged cavalry unit. They are specialists, and being cavalry are faster moving alone as a detachment than they are rolling along with a conventional infantry based force.
In PvE it doesn’t matter where you build your Stables, just remember to rally your Saris away from your main force.
In PvP the Sari detachment is designed to be a small specialist unit, employed to swing a battle in your favour, and not part of the conventional force. Try to build your Stables to the rear of your base, or at least rally your Sari away from your main force, in a place your opponent is unlikely to scout.
The initial set-up as the two armies approach will look something like this,

Once the two armies meet, order your Sari detachment to move past the combat, at a safe distance as to not attract enemy attention.

Then when the combat is in full swing, have your Sari descend on the exposed enemy Archers!

Thanks for reading.
Happy gaming (once the servers are back up at least!)
Chris
Sunday, 1 July 2012
Fortress America Strategy Guide, Part 2: Game board, Natural Defence
Welcome to the 2nd part of my guide to the 2012 edition of Fantasy Flight Games 'Fortress America'.
In this article we will take a look at the game board, with an emphasise on the natural defence of territories, and the need for Combined Arms.
This is a shot of the current editions game board. It is nice and fairly easy to read. The mountain areas are clearly marked, but some City territories are a little hard to visualize as defensible territories due to the way they are marked, the City icon being small when compared to the territory.

Why this matters is because FA favours the defender by allowing them to strike and inflict casualties on an Attacking force, before that force can return fire, and secondly by penalising an Attacker which doesn’t take 'Combined Arms' into a fight (CA is a minimum of 1x Infantry unit, 1x Mech, 1x Air).
The extent of these two factors is not always easily recognizable, but changes as soon as we mark all the territories on the board (in Red) where the Attacker is penalized by not having a CA force.

Now we have a better look at the board, we can see how important retaining CA is. Three other factors also make themselves clearly visible.
Firstly, the Southern Player has a clear shot up the centre of the board where he doesn’t need CA.
Second, the Eastern Player also has a 'back door' to the Chicago/Indianapolis/Cleveland area.
Third, the Western Player is surrounded by a circle of red.
Before we look at what this means for the Invaders, we will discuss the effect this has on America, as it is America who is most concerned with Defence.
America starts scattered. Two units in each city makes it very difficult to organise any form of a real defence. They key to America is to consolidate to as small an area as possible. Victory for America is survival, victory for the Invader is taking Cities. In a future article I will discuss the defence of cities in depth, for now we are concerned chiefly with the over all strategy.
If we are concerned with tightening our defensive belt and consolidating our forces, the natural area to do so is marked on the map below

This basin uses the Rocky Mountains to the West, and the varied mountain ranges on the East as natural defences, and limits the amount of non-red territories to 3 in the centre.
These look weak, but as we will see in the Southern Players brief below, images can be deceiving.
The Southern Player
As a general rule of thumb, Invaders are more concerned with needing Combined Arms to TAKE territories than they are about defensible positions.
So we will look at the map in the view point of attacking.
At first glance the avenue of attack is easily identified – straight up the middle. Undoubtedly a classic strategy and I will discuss such in future articles, but its not as easy as it looks. In fact its often the opposite.

As we know, this article, and the map is concerned with defence. All the natural areas of good defence are marked with red.
The centre approach isn’t red, which means it isn’t a good defensible position. As the attacker must take and hold a territory in order to advance through it, this means his forces may have to defend from any attack. The centre approach isn’t designed to hold such an attack naturally, and worse, if we look at the surrounding areas, they are all red.
Any force moving through here will not be best suited to strike back at its attackers.
Further consideration of the surrounding areas reveal that this natural choke point is in a valley of key American cities which America doesn’t want to lose, and places that will be assured to be reinforced.

If we take the southern area, this is bordered by St Louis and Colorado Springs, and the northern territory is even worse, it also connects with Denver.
Simply considering the Cities alone, that means the northern territory in this channel could in theory be attacked by a force three times it size (15 v 5), and a force which as its attacking into normal territory doesn’t need Combined Arms!
This example hopefully aids to show the importance of all our red marked territories as key territories in FA.
The Eastern Players 'Back door'
While at first sight it would appear to be a nice approach to the American players cluster of cities in the north, if we have learnt anything from the Southern Players example is that this path is not an easy one at all.

The entire route is one which is not defendable, and in turn means the attack doesnt need CA. While any counter attack, is one made against areas that do require CA. The end result is a long and dangerous treck simply to meet more defended red territory. In summary, one route to probably avoid.
The Western Player
Welcome to breakout!

Completely surrounded by red areas makes the Western players advance slow and difficult. Two tricks to remember are, firstly punch through. Don’t get stuck fighting up and down the mountain ranges, simply make like an arrow and head through. Secondly avoid the South.
Invaders cannot move through each others zones, so if the Southern player takes San Diego and Phoenix, this will force the Western player to break his first rule – don’t fight up the mountains!
Thanks for reading. I hope you found this article interesting and I hope it goes some way to demonstrate the natural defensive qualities of the game board that aren’t always obvious on the first look.
Chris
Welcome to the 2nd part of my guide to the 2012 edition of Fantasy Flight Games 'Fortress America'.
In this article we will take a look at the game board, with an emphasise on the natural defence of territories, and the need for Combined Arms.
This is a shot of the current editions game board. It is nice and fairly easy to read. The mountain areas are clearly marked, but some City territories are a little hard to visualize as defensible territories due to the way they are marked, the City icon being small when compared to the territory.

The extent of these two factors is not always easily recognizable, but changes as soon as we mark all the territories on the board (in Red) where the Attacker is penalized by not having a CA force.

Firstly, the Southern Player has a clear shot up the centre of the board where he doesn’t need CA.
Second, the Eastern Player also has a 'back door' to the Chicago/Indianapolis/Cleveland area.
Third, the Western Player is surrounded by a circle of red.
Before we look at what this means for the Invaders, we will discuss the effect this has on America, as it is America who is most concerned with Defence.
America starts scattered. Two units in each city makes it very difficult to organise any form of a real defence. They key to America is to consolidate to as small an area as possible. Victory for America is survival, victory for the Invader is taking Cities. In a future article I will discuss the defence of cities in depth, for now we are concerned chiefly with the over all strategy.
If we are concerned with tightening our defensive belt and consolidating our forces, the natural area to do so is marked on the map below

These look weak, but as we will see in the Southern Players brief below, images can be deceiving.
The Southern Player
As a general rule of thumb, Invaders are more concerned with needing Combined Arms to TAKE territories than they are about defensible positions.
So we will look at the map in the view point of attacking.
At first glance the avenue of attack is easily identified – straight up the middle. Undoubtedly a classic strategy and I will discuss such in future articles, but its not as easy as it looks. In fact its often the opposite.

As we know, this article, and the map is concerned with defence. All the natural areas of good defence are marked with red.
The centre approach isn’t red, which means it isn’t a good defensible position. As the attacker must take and hold a territory in order to advance through it, this means his forces may have to defend from any attack. The centre approach isn’t designed to hold such an attack naturally, and worse, if we look at the surrounding areas, they are all red.
Any force moving through here will not be best suited to strike back at its attackers.
Further consideration of the surrounding areas reveal that this natural choke point is in a valley of key American cities which America doesn’t want to lose, and places that will be assured to be reinforced.

If we take the southern area, this is bordered by St Louis and Colorado Springs, and the northern territory is even worse, it also connects with Denver.
Simply considering the Cities alone, that means the northern territory in this channel could in theory be attacked by a force three times it size (15 v 5), and a force which as its attacking into normal territory doesn’t need Combined Arms!
This example hopefully aids to show the importance of all our red marked territories as key territories in FA.
The Eastern Players 'Back door'
While at first sight it would appear to be a nice approach to the American players cluster of cities in the north, if we have learnt anything from the Southern Players example is that this path is not an easy one at all.

The Western Player
Welcome to breakout!

Completely surrounded by red areas makes the Western players advance slow and difficult. Two tricks to remember are, firstly punch through. Don’t get stuck fighting up and down the mountain ranges, simply make like an arrow and head through. Secondly avoid the South.
Invaders cannot move through each others zones, so if the Southern player takes San Diego and Phoenix, this will force the Western player to break his first rule – don’t fight up the mountains!
Thanks for reading. I hope you found this article interesting and I hope it goes some way to demonstrate the natural defensive qualities of the game board that aren’t always obvious on the first look.
Chris
Archer/Infantry Tactic: Line Withdrawl
Archer/Infantry Basic Tactic: Line Withdrawal
Ever wondered why games like AoEO have 'snare' or some other effect that causes troops to slow down once they reach combat?
Well, its simply to avoid tactics like the one I will cover in this article. Although there are mechanics in place to try and stop this, in many cases they aren’t 100% successful and the tactic is still viable in play.
This tactic relies on the A I’s sheer determination to get in combat with a players troops, regardless of the danger involved. To use this tactic in game all you need is a standard set up of Infantry and Missile Troops.
For this example we will assume both sides are equal and both have a front rank of Infantry troops and a second rank of Missile armed troops. The initial set up looks like this.
 In a standard fight, both sides Infantry will close to hand to hand combat, and the Missile armed troops will stand at their maximum range and fire.
 However, we don’t want any of this. The tactic here is to withdraw the front rank of Infantry. As such,
 The effect of this is to keep the enemy Infantry within Missile range of our troops, but our Infantry are now out of range of the enemies Missile units.
In other words, Blue's Archers fire, Orange's Archers don’t. Instead, Orange spends the entire turn moving forward. Which we reply to by again, withdrawing our Infantry line.

 The same happens as last turn, Blue's Archers get another round of firing, while all Orange can do is move forward.
 The end result is quite effective and a good way to gain an advantage in an even fight.
Thanks for reading.
Any feedback always appreciated!
Chris
Ever wondered why games like AoEO have 'snare' or some other effect that causes troops to slow down once they reach combat?
Well, its simply to avoid tactics like the one I will cover in this article. Although there are mechanics in place to try and stop this, in many cases they aren’t 100% successful and the tactic is still viable in play.
This tactic relies on the A I’s sheer determination to get in combat with a players troops, regardless of the danger involved. To use this tactic in game all you need is a standard set up of Infantry and Missile Troops.
For this example we will assume both sides are equal and both have a front rank of Infantry troops and a second rank of Missile armed troops. The initial set up looks like this.


In other words, Blue's Archers fire, Orange's Archers don’t. Instead, Orange spends the entire turn moving forward. Which we reply to by again, withdrawing our Infantry line.


Thanks for reading.
Any feedback always appreciated!
Chris
Subscribe to:
Posts (Atom)