Introduction


Thanks for visiting my page. To help with navigation, here is a list of popular pages all about Marching in Colour

* The History of Marching In Colour - who is the man behind the words and service, how did it all come about

* Commissioning Models for Painting - how the process works, start to finish, and what you can expect

* Gallery of Artists Work - with over 20 years experience, here is a small sample of finished commissions

* ITEMS FOR SALE - as well as painting models, I also sell pre-painted models and assorted loose models and scenery on Etsy and Ebay. Links here!

* Trade in your old models for Painting Credit * click here for details

* To see details of all current commissions booked-in and estimated completion dates - click here

SCENERY and TERRAIN - for pre-made, handcrafted items of scenery and terrain, please click here

For TUTORIALS please follow this link - click here


Thursday, 9 May 2013

Planetside 2: Xericor's tactica, 'Infantry Hunter' class Lightning Tank


Xericor's Tactica: Lightning Tank (Anti-Infantry)

Hi folks, and thanks for taking the time to check out my guides.

In this guide I will look at the role of the Lightning Tank in an anti-infantry set up – how to use speed and battlefield awareness to get into the best firing positions as well as what to do to evade vehicles that outclass you.

 
The Set Up

This build requires two main components, the 'L100 Python HE' turret, and 'Night Vision' optics. The 'Racer High Speed Chassis' also makes for a nice addition to this build giving the Lightning the speed it needs to escape from danger.

 
The Tactic

The Lightning tank uses its speed to move quickly into a flanking position, or to dart through gaps in terrain to take enemy infantry by surprise.

 
The Flank Manoeuvre

In every major engagement it is vital to understand the position of the battle line. Often this line will be a case of the defender holding an installation and the attacker moving on the building or buildings. In which case the flank is either end of the buildings, or as far as the defender extends.

Where the defender doesn’t hold a building, and the combat is more open field, then the two forces will try to use whatever cover they have available, more often than not this is a large hill or rock formation.

In the example below we can clearly see where the two effective battle lines are. Our Blue forces are positioned along the top of a ridge, and while we cannot see the enemy Red force, we can safely assume that they hold the position around the large rocky outcrop.

 
From here we can plot the best flank to attack – the left has a fairly smooth section of minor hills, the right has a dense collection of scattered rocks. As our plan requires speed and an area to operate we can choose the left side, as marked by the Green line.

Once we reach our destination, the majority of the enemy will be unaware of our attack until it is too late – all their attention will be focussed on the enemy to their immediate front. The result is free kills!


The Decisive Strike

As we discussed in the 'Flank' section, understanding the battle line is vital to the success of this tactic. Where an enemy holds a facility, they will often hold the area in close proximity, and if their numbers allow it, they will seek to extend their battle line and secure the best most advantageous firing positions.

Here we can see the enemy have extended their battle line south of their installation, to include the rocks immediately below their base, from which they can step out, let loose rockets at our approaching vehicles, then duck back in cover.

 
This is where our speed becomes vital to our success – don’t play the enemy at their own game, instead look to strike fast and hard at the correct moment.

The choice to engage here was made AFTER the enemy had fired their rockets and while the enemy was RELOADING – speed was key, as was 'burst radius'.

 
Tip - Burst Radius/Splash Damage

High Explosive shells explode when they hit anything solid, and anything within a few metres of the hit will take damage from the explosion. Always try to aim for targets that are moving against a solid feature, such as a hill, a tree, or the side of a building so even if you miss the kill shot you will still damage the enemy and possibly get them on the next shot, or pick up points for the assist.

As we can see from the photo below the only kill shot here is a direct hit. The target is very small and we are moving, this makes it a very hard shot. If our shot hits blue, then its a clear miss, and if our shot hits grey its unlikely the target will receive any splash damage as the enemy is placed the wrong side of the hill.

 
Evasion Tactics

This tank is built for speed and anti-infantry duties, and it will have a very rough time against MBT's or Air units. It is therefore vital we learn the tactics of evasion, and how to use our speed and manoeuvrability to best effect.

 
Evading Air

A common tactic used by veteran air players is to approach from the rear of their target and use Rocket Pods on the weak armour. A common response by the vehicle is to power drive away in a straight line. This is the wrong tactic to use. An air unit needs to line up the vehicle perfectly and unleash a barrage of rockets. As the air unit is moving forward, the pilot doesn’t mind if their target also moves forward, as a good pilot can keep the angle and speed of their approach in check and still hit the vehicle as it pulls away.

What we need to do is 'zigzag'. Evade left then centre, then right, then centre.
 

This breaks the air units line of attack. Its weapons are fixed forward, it cannot rotate its cannons like a tank can its turret, it must shift its whole body. What this means is the pilot must adjust their aim for every shot they take. The more effort we force, the more chance they will fail.

 
Evading Armour

The key to evading enemy heavy tanks lies with two factors – speed and distance, and we must learn to maximise both of these parameters to make it doubly hard for the enemy to land a direct shot.

A good tank commander can easily predict, and compensate, for one aspect. If the target is moving left to right, then they will place their shots slightly to the right of the target. Likewise if a target is moving away, placing a shot ahead of them is the best idea to score a hit.

When evading armour remember these two factors and take a diagonal path away from the enemy. Give them both aspects to take into consideration when placing their shots.

Avoid being a fairground duck shoot.


Thanks for reading and good hunting soldier!

 
PS. Be on the lookout for enemy Sunderers and flank them! Please don’t farm the position, target the Sundy and use the splash damage to kill the infantry. It will take you a lot of shots to bring down the Sundy while you pick up a lot of kills on the panicking troops!


Tuesday, 7 May 2013

Planetside 2: Xericor's Tactica, Infantry Assault on a Small Base


Xericor's Tactica: Infantry Assault (Small Base)

 
The taking of bases is key to Planetside 2 and in this article I will look at a standard Infantry approach to capturing a typical small base. Understanding structures and terrain, fire arcs and positioning are vital to the basic infantryman. Failure to understand the surroundings leaves the foot soldier susceptible to being killed, and if enough troops go down to enemy fire even the most basic of assaults becomes a drawn out engagement.


Step One – The Approach (Minimap)

Instead of steaming full speed ahead into any fight, take a moment to understand your location and plan your attack. It is always best to think-out your moves ahead of time. To help you do this you must learn to extend (and collapse) your minimap.

 
The default key for this is 'H'.

 
When moving to and from locations always use the map in its extended format. This allows you to spot any enemy units ahead of time.

When fighting in close proximity, knowing what is 100yards away from you becomes less important, so a collapsed (small size) mini map is better as it becomes less of a distraction.

The other aspect to be aware of is what you are actually attacking, what type of base is it, who holds the territory and who holds the surrounding area.

In this example we are going to use a small base with two main approaches – one, blue, which we hold, and the other, red, which the enemy holds, and we are going to place the base directly in the middle.


Step Two – Placing Key Locations

Every base has a capture point (with larger bases having more than one point), and a 'safe area/spawn room' where the enemy can respawn, rearm, and fire from relative safety. It is key that we identify these areas before we arrive at the base, then understand how they sit in proximity to the layout of the base.

In this example we can see that the capture point is at the base of the tower, in a courtyard which is closed on three sides, and that the enemy spawn room is at the far end of the base up a slight ridge.

 
What we learn from this is that, unless we take Light Infantry (with jetpack), our approach to the capture point is restricted to the open area on the left, or through the buildings to the right.

Attacking into and through buildings always favours the defender – they can set traps and have a small target area (the doorway) to cover. People coming through a doorway present easy targets to a defender hiding in a room.

We can therefore draw a theoretical line along which we can expect to meet an enemy defence, shown on the map as the long red line.

 
Tip – Attacking through a Doorway

Always be on guard when moving into a building where you know, or suspect, there are enemy agents. The first thing to check for is explosives placed near the entrance to the room. AI mines and C4 are common weapons employed here.

 
Next, be careful of the corners close to the rear of the building. Its from here that most players will stop and shoot. The doorway makes you a nice target, and the doorway behind them gives the enemy a sense of security, that they can run away if they feel out of their depth That or they will use the corner to shield themselves from your fire, while you have nowhere to hide.

The map also shows one other key point – a section of 'no man's land'. This area is marked by the letter 'A'. This area is a direct approach from the respawn to the capture point but it is completely free of cover. Any player trying to move up or down this patch of land will be shot dead before they could make it half way. No combat will take place along this path.

 
Step Three – Controlling the Area

In order to fully lock down the base we must look at what we can and cannot control, identify where the enemy will be, and what positions we need to hold in order to restrict their movement and stop any counter-assault on the capture point.

The place to start is the place we cannot control – the enemy spawn area.

To do this we must look at what the enemy can and cannot see from the safety of their area. In this example I am going to cheat a little and take a couple of shots from the enemy spawn area.

These two photos show the view from the enemies perspective.


From placing ourselves in the enemies shoes, we can see that much of the area is shielded from view by the large central building. This then becomes the place we need to take, hold and control to fully restrict the enemy.

The following picture shows the safe approach to taking this building.

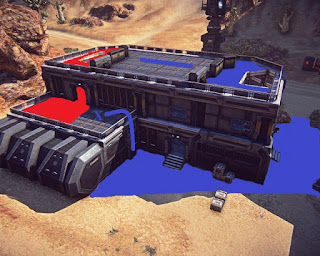
Note the front balcony is marked with an 'X'. While a Light Assault can easily scale this height, the entire balcony is in clear view of the enemy. Anybody trying to take this approach will be in clear view of enemy fire. This path is not recommended. Instead, to take this building, we must take the roof.

 
Taking the set of barricades at the left of the photo, allows for ideal firing positions to control the roof of the enemy spawn area.

 
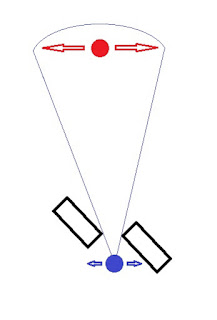
To understand the relevance of this position we must use a small diagram, and look at how distance relates to firing arcs and the field of view.

As we can see the area we can cover extends in relation to the distance to the target. What this means is that when giving fire, our target has to move further to avoid receiving damage, while we need only do a small side step to completely avoid the enemies shots.

This makes the top barricades vital positions to hold, in unison with allied troops covering the ground floor entrance/exits.

Advanced Tip – Light Assault troops should also consider raised structures when selecting advantageous firing positions. Often these areas have nice concealed shooting positions where the enemy will never expect to find you!


Step Four – Lock-down Positions

Often assaulting a base comes down to remembering 2 key principles -

 
Restricting the enemy movement
Intercepting or blocking reinforcements

 
In our example we can mark these paths with the letters, A to E.

 
A – This is the path any reinforcements will come along. Its vital at least one person moves to this position to watch for enemy movement and raise the alarm if enemy troops are spotted. Snipers with long distance scopes and Heavy troops armed with Rocket Launchers are best deployed here.

B, C, D – These are the key positions to lock down the enemy base. Positions B and C can be held by any class of troops. Position C is best taken to Light Assault troops who can jetpack directly to the roof and avoid the dangers of attacking through buildings.

E – Represents one of the Advanced Firing Positions, the type of which the enemy will not immediately place you. In this example we have the rocky side of a mountain, a position good for snipers, or rocket armed troops.


Tip - NV Scope
Most scopes are usually xRange to help with aiming and shooting at distance. For situations like this, where the fighting is all close range, consider ditching you regular scope and using a NV scope instead.


In Summary -

Hopefully this guide has gone some way to helping you better understand positioning when taking and assaulting a base. Never stand around like a lost sheep in one area, always consider the possible route of the enemy and get yourself in the best position you can.

Think ahead and take a look at the area you are attacking prior to arriving there. Identify key areas you need to take, and think where the enemy will be, where they will try and move from and get yourself into the best position to stop them from doing so.

If you control the situation you will control the battle.


Thanks for reading, and good luck in the game!

Sunday, 5 May 2013

Planetside 2: Xericor's Tactica, Tank Support Engineer


Xericors Tactica: Tank Support Engineer

Hi, and thanks for taking the time to check out this guide. I'm a big fan of PS2 and now that I have clocked up over 400hrs of game time I feel I have the experience to start writing my Tactica.

First up – a favourite play style of mine, the MBT Support Engineer.


Any faction's Main Battle Tank is a combat winner in itself, heavily armoured with a great mix of weaponry it brings awesome fire-power to the team and a morale boost to those friendly troops stuck in a tight situation. In this guide I hope to show how its life expectancy and its battle strength can be improved by having a good engineer man the secondary weapon position.


'Riding shotgun' isn’t all about killing stuff, the Support Engineer must act as an observer as well as a mobile mechanic, calling out threats and targets, watching the skies, and nimbly hopping in and out of the tank for quick or extended repairs. This is the role of the TSE. Let the driver concentrate on landing his shots accurately while you save the day.

 
Role One – Repairs

Keeping the tank active isn’t about jumping out once the vehicle hits red and frantically trying to repair. This only leads to the tank blowing up and killing you, or the driver panicking and running you down, or more commonly, reversing away and leaving you in the middle of the field getting shelled.

The TSE must learn to be nimble in his/her repairs. Jumping out for small fast repairs, then hoping straight back in, raining fire on the enemy, then jumping out again once your Repair Tool has cooled down. Also learning to stay protected for long repairs when the tank is in trouble is key to success.

 
Tip: Use the tank for cover and keep dancing left and right to avoid snipers!


To start with lets look at where the game will eject you once you jump out. Generally speaking you will exit the tank on one side, roughly at the middle of the vehicle.
 
For this example we will use the left hand side Exit, and mark the operational zone of the Engineer with a Blue line. We will also assume that the enemy threat lies somewhere ahead of the vehicle.


The Short Repair

Whilst the secondary weapon can be very powerful, we must always remember that the primary weapon is the key damage dealer and that our role here is one of support and maintaining the longevity of the vehicle. The TSE should jump out for small repairs as often as the situation allows. Keep close to the tank, use the vehicle as cover, and should you take any damage – safety is only a quick press of the 'E' key to jump back on board.

Try to time your repairs between the enemies' shots. While the enemy is reloading, jump out and repair the damage.

The Long Repair

Begin the repair as soon as you exit the vehicle, but this time start moving backwards towards the rear of the vehicle.


Its safe to assume that the fighting is heavy if you need to deliver an extended repair, so moving slightly behind the vehicle gives you a better chance of cover. It's important to note here the TSE must move beyond the 'jump back in' range, and move as far back as their repair beam will allow.

This allows the vehicle to withdraw, while still receiving a repair.

If the TSE has positioned themselves well, as the tank withdraws and the engineers gun reaches maximum, the tank should breeze past the engineer within 'jump back in' distance. Assuming the tank is not about to explode, this move will bring the secondary weapon back into play, while the Engineers repair tool cools down. Your role is now that of gunner while you wait for the cool down on your Repair Tool.

From here, we have the option of firing a shot while the gun cools, then jumping back out and doing either another series of short repairs, or a long repair as and what the situation calls for, thus maximising the TSE's combat effectiveness.


Role Two – The Observer

It can be tricky for the driver of a MBT to have and retain perfect situational awareness while moving or in combat. For tanks with turrets, the need to rotate the turret, and the time it takes to do so is a delaying factor to spotting danger. This is where the TSE, in a smaller, faster rotational turret can react to danger quicker than the driver. The driver also needs to focus and aim his shots down one barrel meaning they spend most of their time looking at what they are shooting at, and not the mini map.

Its therefore vital to the life expectancy of the vehicle that not only does the TSE repair the damage and assist in fire support with the secondary weapon, but they also must act as the ever alert observer.

And.. for those who really don’t know.. the default key to 'spot' the enemy is 'Q'. Pressing this key while looking at the enemy (or that you suspect may be enemy), will have your character 'shout out' the danger in addition to marking the enemy on all friendly units minimaps within range.

To best highlight the role of the observer lets look at three real situations taken from the game – 'Heavy Combat', 'Targeted Engagement', and 'General Approach'


Heavy Combat


This is a tough fight around a large facility. The situation is extremely dangerous. We have marked on the map 4 key areas the observer must keep paying attention to, these areas are labelled A,B,C, and D.

A - Here we have two tanks going head to head. An alert observer should note that the enemy tank is heavy and the friendly tank, in blue, is light. In all likelihood that the enemy tank will win the engagement and thus be in a position to threaten our right flank. The observer must keep alert of this encounter, mark and shout out the threat of the flanking enemy (and probably shoot the tank once it approaches, unless the friendly driver is really on the ball).

B – A similar situation to 'A', the enemy tank is heavy and the friendly is light. Here however we also have enemy infantry to contend with.

C – The enemy hold both an infantry spawn and a vehicle spawn. There is a real threat of more units emerging from this location and the observer must keep an eye on both infantry and vehicle entry routes.

D – The enemy Sunderer.. If this is deployed, it can spawn infantry that can take the hill and hold advantageous firing positions.


The TSE in this situation should assist with shooting into B, calling out targets that pose the most threat such as infantry armed with C4 while keeping a very careful eye on the results of A and any infantry emerging from C.


Targeted Engagement


Here we have a combat where, thanks to a great scout by the friendly aircraft, we can place the majority of the enemy – all behind a hill.

In the role of observer the TSE must pay attention to three areas.

A – Here is the main combat. Its here that our main driver/gunner will be focussing their attention. The observer need only call out real dangerous threats – heavies taking their time to aim, or again any C4 armed troops moving from the pack.

B – Represents a high ridge. The danger here is any clever infantry breaking off from point A, moving unseen alongside the ridge, then shooing from anywhere along B. Engineers with turrets are likely to try this as they will not need ammo packs as a Heavy would for their rockets. Enemy support vehicles coming to help out are also a threat.

C – This letter is in a 'box' as it represents the ever present threat of enemy air units. Enemy air is always a threat, but this time we must note our location in relative to all the ally troops. We are slap bang in the open field. Any approaching aircraft will see us from a distance, and we have no immediate cover to withdraw to.


For this situation its important the TSE doesn’t get too distracted by the main combat. As a secondary gunner you should be looking to land good shots on the enemy and score your own kills, but never get 'tunnel vision' and focus solely on one area. Also, stay very close to the tank and use fast and light repairs. There is a good chance of the TSE getting picked off, so be prepared to use 'E' to hop in and out of the vehicle quickly.


General Approach


Its never recommended to move out anywhere alone, so this situation requires the TSE to be on full alert as danger could come from any of the 4 locations. Its also likely that our driver will be focused on the base ahead, avoiding major pit holes of terrain, and looking for any enemy units amongst the buildings. The observer must pay attention to the following,

A – The base. Help the main driver spot any hostile units. Look for areas where troops are likely to spawn.

B – The two roads and the flat area to the north could bring enemy units to hit our flank. It's also worth noting in this example that the friendly infantry in the base is moving towards B, maybe they have spotted something?

C – This road is hidden to our view and so poses a real threat. Any vehicle coming up this road will remain hidden from us until the last moment, at which they will be in a position to threaten our flank or even rear.

D – Marks the ever present threat of enemy air.


The lesson here is vigilance. The TSE as an observer has a better range of vision that the tanks main driver. Keep a sharp eye out in all directions and especially on the skies – spot and call out any hostile air before they become aware of your location.


In summary

Hopefully we can see that riding in a vehicle is more than just playing the gunner and shooting at whatever the driver is shooting at. The ideal character class to have manning the secondary gunner position is the Tank Support Engineer, and that this player should be the eyes and ears of the vehicle .

Hop in and hop out for repairs, be fast, alert and agile. Use the tank for cover, and move to the rear – but not behind – the tank for extended repairs.


Above all – be polite. This is a team game, show the driver and owner of the vehicle that you are an asset to have on board. Key 'V, then 1' says 'Thanks' – thanks for allowing to TSE to man the secondary weapon. And drivers, please be sure to return the thanks, the TSE risks life and limb keeping you alive and active in the fight!


Remember – utilising both guns on your vehicle makes you stronger and bringing along someone who can repair your tank, even if as the driver you are an Engineer yourself, improves the life expectancy of the vehicle!


Thanks for reading. And go NC!!